
 Pin it
Chicken Sausages with Zucchini, Tomatoes, and Pasta delivers vibrant Mediterranean flavors in a lightning-fast dinner that transforms everyday ingredients into something truly crave-worthy. This brilliantly simple dish celebrates the natural marriage between juicy chicken sausages, garden-fresh zucchini, and sweet cherry tomatoes tossed with perfectly cooked pasta. The entire meal comes together in under 30 minutes yet tastes like something that simmered for hours, making it the ultimate solution for hectic weeknights when you want something satisfying without surrendering to takeout.
I developed this recipe during a particularly chaotic week when my fridge contained little more than some chicken sausages and farmers market vegetables that needed using. What began as desperation cooking became an instant family favorite. My teenager, who typically avoids anything green, actually asked for seconds and mentioned "this one's actually good" – the culinary equivalent of a standing ovation from a notoriously picky eater.
Essential Elements
- Chicken sausages: Provide substantial protein while offering more complex flavor than plain chicken. Choose pre-cooked varieties with interesting seasoning profiles like garlic-herb, Italian, or sun-dried tomato for built-in flavor without extra work.
- Zucchini: Creates substantial vegetable presence with mild flavor that readily absorbs the surrounding seasonings. Its quick cooking time and ability to maintain slight texture when properly prepared makes it ideal for this dish.
- Cherry tomatoes: Deliver bright acidity and natural sweetness that bursts when heated. Their small size allows them to break down quickly, creating instant sauce without extended cooking time.
- Pasta: Forms the satisfying foundation that brings everything together. Medium shapes like penne, rotini, or farfalle catch sauce in their crevices, while long noodles like spaghetti wrap around the vegetables and sausage pieces.
- Garlic: Contributes essential aromatic quality that permeates the entire dish. Fresh cloves offer significantly more complex flavor than pre-minced versions and create beautiful fragrance as they hit the hot oil.
- Dried herbs: Provide concentrated Mediterranean flavor without requiring fresh herbs. The intense aromatic compounds in dried oregano and basil bloom in the hot oil, infusing the entire dish with their essential oils.
Creating Magic
- Prepare The Pasta
- Begin with a generous pot of water – at least 4 quarts for 8 ounces of pasta to ensure proper cooking space. Salt it assertively with a full tablespoon of kosher salt; proper pasta water should taste like seawater. This initial seasoning is crucial as it's your only opportunity to flavor the pasta itself rather than just coating it. Bring the water to a vigorous boil before adding your chosen pasta shape. Cook it precisely according to package directions, but start testing for doneness about a minute before the suggested time. You're looking for al dente texture with slight resistance in the center – not completely soft – as the pasta will continue cooking slightly when tossed with the hot vegetables. Reserve about half a cup of the starchy cooking water before draining, as this liquid gold contains starches that help sauce cling to pasta and adds silkiness to the final dish.
- Transform The Sausages
- While the pasta cooks, place a large skillet over medium heat and add one tablespoon of olive oil, swirling to coat the pan evenly. Once the oil shimmers but doesn't smoke, add four chicken sausages to the hot surface. Let them cook completely undisturbed for about three minutes to develop golden caramelization on the first side. This patience creates crucial flavor through browning reactions. Turn the sausages and cook for another three minutes, continuing to let them develop color on all sides. The goal is beautiful browning while heating them through completely. Once nicely caramelized, transfer the sausages to a cutting board – don't slice them immediately. Allowing them to rest for a few minutes lets the juices redistribute, ensuring they remain moist when cut. After a brief rest, slice them into half-inch bias-cut pieces, creating oval shapes that look appealing and provide more surface area for sauce to cling to.
- Build Flavors Layer By Layer
- Return the same skillet to the heat, maintaining all the flavorful fond (browned bits) left by the sausages. Add three minced garlic cloves directly to the pan and stir continuously for exactly 30 seconds until fragrant but not browned – burned garlic turns bitter and can ruin the entire dish. Immediately add the sliced zucchini – two medium ones cut into quarter-inch half-moons – along with a half teaspoon of salt and quarter teaspoon of freshly ground black pepper. The salt helps draw moisture from the zucchini through osmosis, accelerating the cooking process. Sauté for approximately four minutes, stirring occasionally but not constantly, allowing some pieces to develop golden edges that indicate caramelization. The zucchini should soften slightly but maintain some texture, becoming tender-crisp rather than mushy.
- Create Instant Sauce
- Once the zucchini has softened but still holds its shape, add two cups of halved cherry tomatoes directly to the hot skillet. They'll immediately begin to release their juices, creating the foundation for your sauce. Sprinkle one teaspoon each of dried oregano and dried basil over everything, crushing the herbs slightly between your fingers as you add them to release more of their essential oils. Stir everything together, allowing the tomatoes to soften over medium heat for about three minutes until they begin to collapse but aren't completely broken down. Some tomatoes should remain whole while others soften completely, creating textural interest. This brief cooking develops flavor while maintaining the fresh, bright quality that makes this dish so appealing. The acidity from the tomatoes helps deglaze the pan, incorporating all those flavorful browned bits from the sausages into your sauce.
- Unite The Elements
- Add the sliced chicken sausages back to the skillet with the vegetables, including any juices that have accumulated on the cutting board – that's pure flavor. Toss everything together and let it simmer for one to two minutes, allowing the sausages to heat through again and absorb some of the tomato juices. Next, add the drained pasta directly to the skillet, using tongs or a large spoon to distribute it evenly throughout the vegetables and sausages. If the mixture seems too dry, add a splash of the reserved pasta cooking water, about two to three tablespoons at a time, tossing after each addition until the pasta is sufficiently moistened but not swimming in liquid. The starchy water helps create a silky coating that binds everything together. Continue tossing for about one minute to ensure even distribution and to allow the pasta to absorb the flavors of the sauce.
- Perfect The Finish
- Once everything is well combined, taste the dish and adjust seasonings if needed – pasta typically requires more salt than you might expect to taste properly seasoned. Add additional black pepper for sharpness or dried herbs if you prefer more intense flavor. For brightness, squeeze half a lemon over the dish and toss again; the acidity balances the richness of the sausages and helps all the flavors pop. If you have it on hand, add a quarter cup of roughly chopped fresh basil or parsley at the very end, tossing just enough to distribute it without wilting. The heat from the pasta will release the herbs' aromatics without fully cooking them, maintaining their fresh quality. These fresh herbs provide both visual appeal with their vibrant green color and a burst of flavor that counterbalances the cooked elements.
- Serve With Style
- Transfer the finished dish to a large, warmed serving bowl or serve directly from the skillet for a more rustic presentation. The colorful medley of red tomatoes, green zucchini, and golden sausages creates a naturally beautiful dish without requiring fancy garnishing. If desired, offer freshly grated Parmesan or Pecorino Romano cheese at the table along with crushed red pepper flakes for those who enjoy additional heat. A simple side salad of arugula dressed with lemon juice and olive oil makes the perfect accompaniment, adding peppery freshness that complements the warm pasta dish. For a complete experience, serve with a glass of chilled Pinot Grigio or Sauvignon Blanc, whose crisp acidity pairs perfectly with the tomato-based sauce, or sparkling water with a twist of lemon for a non-alcoholic option that cleanses the palate between bites.
I discovered the magic of this combination when rushed for time but determined to make something healthier than takeout. My neighbor dropped by as I was cooking and ended up staying for dinner, asking for the recipe before she left. The secret really lies in the timing – keeping the vegetables just crisp enough for texture while allowing the flavors to meld creates something far greater than the sum of its simple parts.
Perfect Pairings
This versatile pasta dish pairs beautifully with light sides that complement without competing. A simple arugula salad dressed with lemon juice, olive oil, and a sprinkle of salt provides peppery contrast that cuts through the richness of the sausages. For bread lovers, a slice of crusty Italian bread or warm focaccia makes the perfect vehicle for capturing any remaining sauce. A glass of crisp white wine like Pinot Grigio or Verdicchio creates a classic Italian pairing, though a light beer works wonderfully too. For a complete Mediterranean experience, serve with marinated olives or a small caprese salad as a starter.
Creative Variations
Transform this basic recipe by incorporating a handful of baby spinach during the final toss – it wilts instantly from the residual heat, adding nutrition and vibrant color. For a spicier version, choose hot Italian chicken sausage and add crushed red pepper flakes along with the dried herbs. Create a creamier variation by stirring in two tablespoons of mascarpone or cream cheese just before adding the pasta, creating a rose-style sauce that clings beautifully to every bite. For an earthy twist, add a cup of sliced mushrooms along with the zucchini, allowing them to brown slightly before adding the tomatoes.
Storage Success
This dish creates exceptional leftovers that maintain their flavor beautifully for quick lunches or repeat dinners. Store cooled portions in airtight containers in the refrigerator for up to three days. When reheating, add a splash of water or chicken broth to refresh the sauce, then warm gently in a covered skillet over medium-low heat until just heated through. For microwave reheating, cover with a damp paper towel and heat at 70% power in one-minute intervals, stirring between each until warmed to your liking. The flavors actually develop overnight, making next-day portions sometimes even more delicious than the original serving.
Kitchen Wisdom
- Avoid stirring the vegetables constantly – some contact with the hot pan creates caramelization and deeper flavor
- Choose chicken sausages with complementary seasonings like garlic, herbs, or sun-dried tomatoes
- For perfectly cooked pasta, taste it rather than strictly following package timing
My final thought on this Chicken Sausages with Zucchini, Tomatoes, and Pasta dish is that it beautifully demonstrates how thoughtfully prepared simple ingredients can create something far more satisfying than their humble origins might suggest. I've prepared this meal for everything from solo weeknight dinners to casual gatherings with friends, and it never fails to generate compliments and recipe requests. There's something deeply satisfying about transforming everyday ingredients into a colorful, flavorful dish that nourishes both body and spirit – proving that excellent cooking doesn't require exotic ingredients or complicated techniques, just attention to detail and proper technique with the basics.
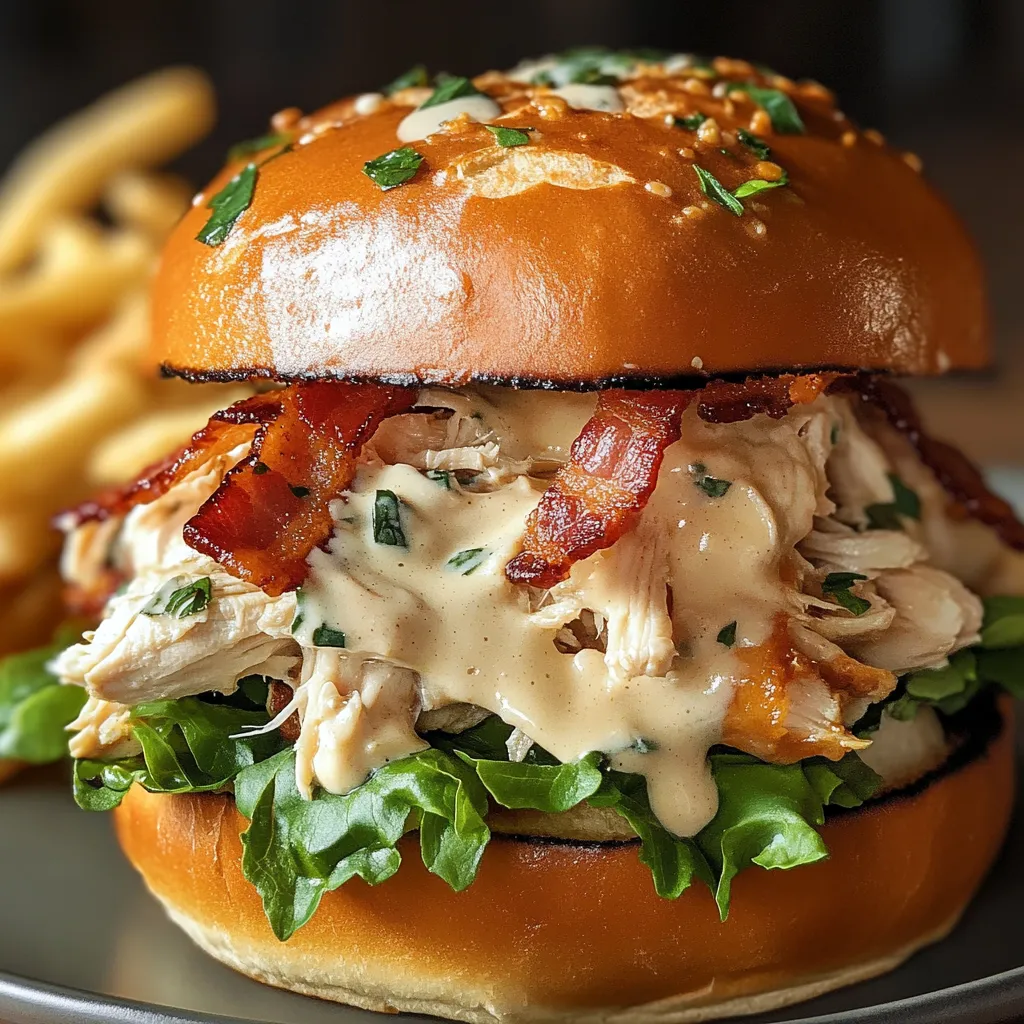
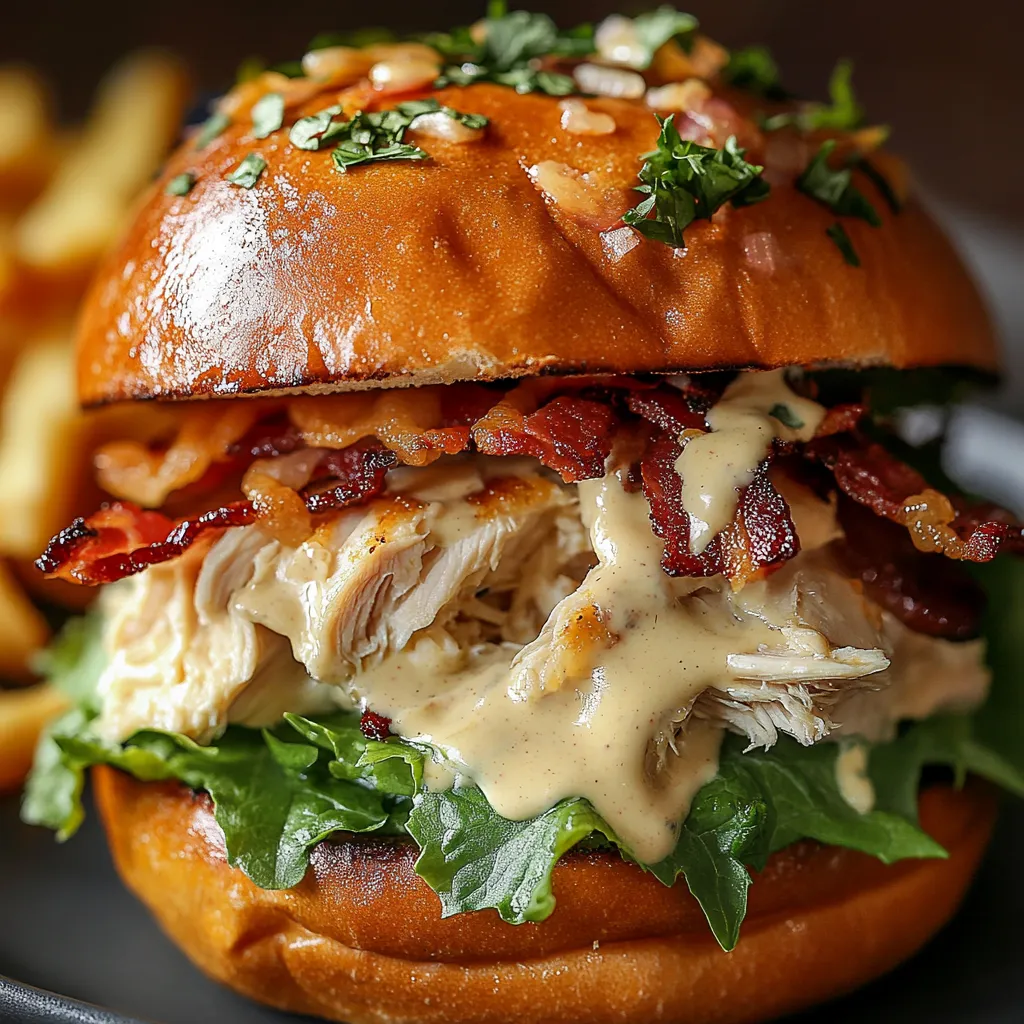
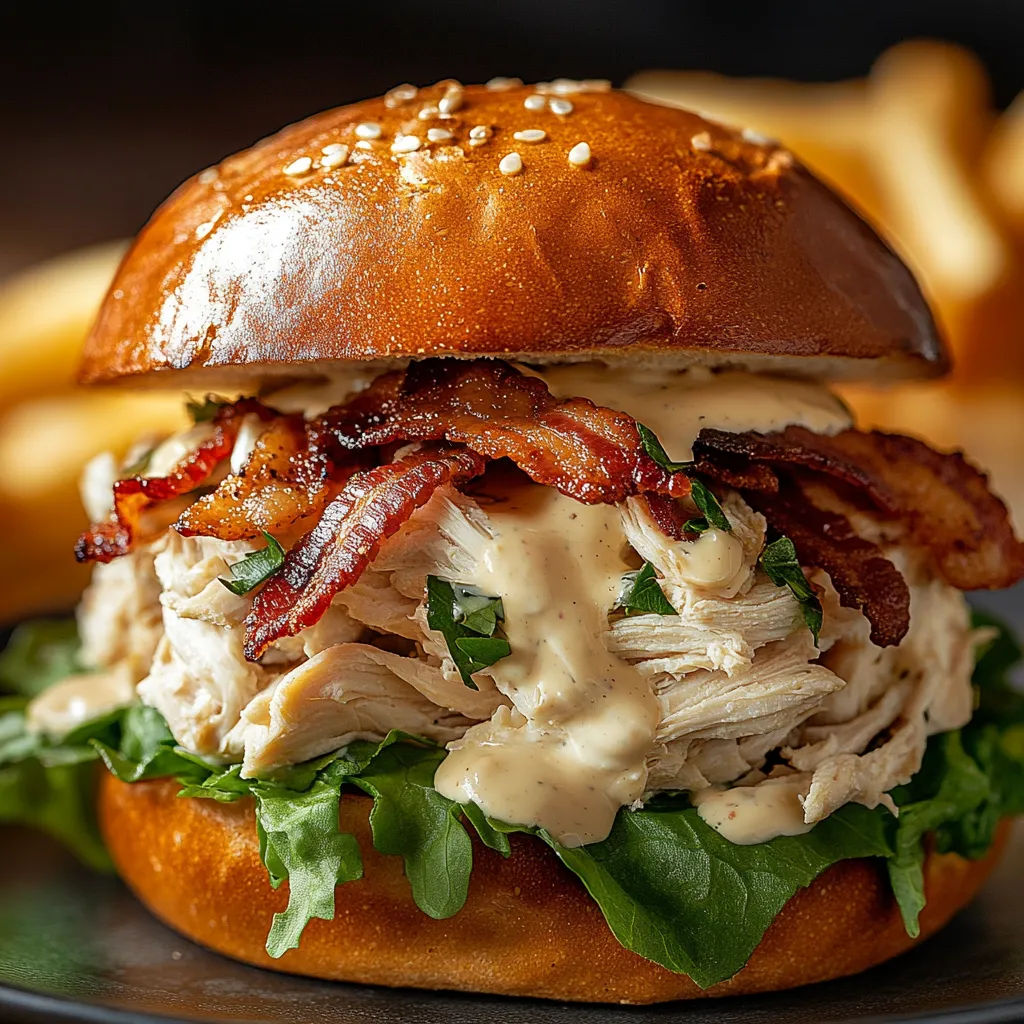
# Slow Cooker Chicken Bacon Ranch Sandwiches
Tender shredded chicken mixed with creamy ranch seasoning and crispy bacon creates the ultimate comfort food sandwich. This slow cooker recipe transforms simple ingredients into a mouthwatering meal that brings everyone to the table. The combination of savory chicken, smoky bacon bits, and tangy ranch flavor melds together during the slow cooking process, resulting in sandwiches that are both satisfying and incredibly flavorful.
I made these sandwiches last weekend when my sister's family visited unexpectedly. Everyone raved about them, even my nephew who typically avoids trying new foods. The kitchen filled with mouthwatering aromas as the chicken cooked, and I loved how I could prepare everything ahead of time and focus on spending quality time with family instead of being stuck in the kitchen.
Kitchen Essentials
- Boneless chicken breasts: Choose plump, even-sized pieces for consistent cooking; organic options provide the best flavor and texture
- Ranch seasoning packet: Contains the perfect blend of herbs and spices that infuse the chicken with iconic ranch flavor; look for varieties without artificial ingredients
- Chicken broth: Adds moisture and prevents the chicken from drying out; homemade broth introduces deeper flavor notes
- Bacon strips: Select thick-cut varieties for more pronounced smoky flavor and satisfying texture in every bite
- Cream cheese: Creates the creamy base that binds everything together; bring to room temperature before using for easier incorporation
- Cheddar cheese: Sharp varieties provide the most pronounced flavor contrast; freshly grated melts more smoothly than pre-packaged options
- Sandwich rolls: Sturdy rolls with slightly crisp exteriors best support the hearty filling without becoming soggy
- Fresh parsley: Brightens the rich flavors and adds visual appeal; choose bunches with vibrant green leaves
Cooking Journey
- Prepare The Base
- Arrange the boneless chicken breasts in a single layer at the bottom of your slow cooker. Pour chicken broth over the meat, ensuring it's evenly distributed. Sprinkle the entire packet of ranch seasoning across the chicken, making sure each piece gets coated with the flavorful herbs and spices. Cover with the lid and allow the flavors to develop slowly.
- Cook To Perfection
- Set your slow cooker to low heat for 6-7 hours if you're planning ahead, or choose high heat for 3-4 hours if you're shorter on time. The chicken will gradually absorb the ranch flavors while becoming incredibly tender. You'll know it's ready when the meat easily shreds when pressed with a fork.
- Create The Filling
- Remove the cooked chicken from the slow cooker and transfer to a large bowl. Use two forks to shred the meat completely, pulling apart the fibers until you achieve a consistent texture throughout. Return the shredded chicken to the slow cooker, adding the softened cream cheese and crumbled bacon pieces. Stir thoroughly until the cream cheese melts completely and coats every strand of chicken.
- Assembly Time
- Lightly toast your chosen sandwich rolls until they develop a golden exterior while maintaining a soft interior. This creates a sturdy base that stands up to the creamy filling. Spoon generous portions of the chicken mixture onto the bottom half of each roll, being careful not to overfill. Top with a layer of shredded cheddar cheese, allowing it to melt slightly from the warmth of the chicken. Finish with a sprinkle of fresh chopped parsley for brightness and visual appeal.
 Pin it
My family particularly loves the bacon in this recipe. My husband often requests extra crispy bacon pieces sprinkled on top for added texture contrast. When my mother first tried these sandwiches, she was skeptical about the cream cheese addition but quickly became convinced after one bite. The creaminess it adds transforms what could be an ordinary sandwich into something truly special.
Complement Your Meal
Creating the perfect meal experience involves more than just the sandwiches themselves. These sandwiches pair wonderfully with fresh, crisp sides that balance their rich flavors. A simple garden salad with vinaigrette dressing provides refreshing contrast, while homemade sweet potato fries offer a slightly sweet counterpoint to the savory filling. For casual gatherings, kettle-cooked potato chips provide satisfying crunch alongside the creamy sandwich filling.
Custom Creations
Transform this versatile recipe to suit various tastes and dietary preferences with thoughtful modifications. Substitute turkey bacon for traditional pork varieties to reduce fat content without sacrificing flavor. For those avoiding dairy, try dairy-free cream cheese alternatives and skip the cheddar or use plant-based cheese options. Spice lovers can add diced jalapeños or a sprinkle of red pepper flakes to the chicken mixture for welcome heat. During summer months, try adding sliced avocado and fresh tomato when assembling for bright, seasonal flavor.
Keeping Leftovers Fresh
Properly stored leftovers maintain their flavor and texture for several days, extending the enjoyment of your cooking efforts. Transfer any remaining chicken mixture to shallow airtight containers and refrigerate within two hours of cooking. When properly stored, the mixture stays fresh for up to four days in the refrigerator. For longer preservation, portion the cooled mixture into freezer bags, press flat to remove air, and freeze for up to three months. Thaw overnight in the refrigerator before gently reheating in a saucepan over medium-low heat, adding a splash of chicken broth if needed to restore creaminess.
Expert Insights
- Allow cream cheese to come to room temperature before adding to the slow cooker for smoother incorporation and fewer lumps
- For extra flavor dimension, toast the sandwich rolls with a light brush of garlic butter before adding the chicken mixture
- Let the filled slow cooker sit on the "warm" setting for 30 minutes after mixing in cream cheese to allow flavors to fully meld together
My journey with this recipe began five years ago when searching for crowd-pleasing options for family gatherings. What started as a simple weeknight dinner has become my most requested recipe when hosting friends. The beauty of slow cooker recipes like this one lies in their forgiving nature—even when I've forgotten to defrost the chicken completely or substituted ingredients based on what was available in my pantry, the results have always been delicious.
 Pin it
Frequently Asked Questions
- → What type of chicken is best for this recipe?
- Boneless, skinless chicken breasts work best for this recipe.
- → Can I use a different type of cheese?
- Cheddar cheese is recommended, but you can use any melting cheese you prefer.
- → How can I make this recipe spicier?
- Add a few dashes of hot sauce or chopped jalapeños for a spicy kick.
- → What can I serve with these sandwiches?
- Serve with a side of chips, fries, or a green salad for a complete meal.
- → How long does this recipe take to prepare?
- It takes about 10 minutes to prep and 6 hours to cook on LOW or 3-4 hours on HIGH.